
Stop Scammers in Their Tracks: Strengthen Email Security with These Essential Protocols
- Chana Karp

- Dec 19, 2024
- 7 min read
Since the early 90s, people have been inundated with email phishing scams, most notably the infamous Nigerian prince who needs a small cash advance or personal information to unlock a large reward.

As people became more security-savvy, scammers adapted and grew more sophisticated. They began sending emails filled with malicious links, hoping unsuspecting individuals would download malware disguised as a popular file. Many were tricked into sharing personal information, believing they were communicating with their bank or acquaintances.
It soon became apparent that email security was essential. Email security refers to protecting email accounts from phishing attacks, account takeovers, and compromised communications.
Email security was designed to allow organizations to protect their name from fraudulent use by scammers. For instance, banks want to prevent people from losing money or having their data stolen due to fake emails sent under their name. Additionally, organizations need to ensure that their legitimate emails are delivered correctly and not flagged as spam or blocked entirely.
To address these issues, three protocols were created: SPF, DKIM, and DMARC. When these protocols are put together, companies have more control over emails being sent with their domain name. This protects both themselves and consumers from phishing attacks.
SPF
The Sender Policy Framework (SPF) is an email authentication protocol used to prevent email spoofing, ensuring that incoming emails are genuinely sent by the domain they claim to represent. It aims to reduce the likelihood of phishing and spamming attempts by verifying the sender's identity.
How SPF Works
The company sets up an SPF record in its Domain Name System (DNS). This record contains a list of IP addresses or servers authorized to send emails on behalf of the company’s domain. This list can include the company's internal servers, employee devices, and third-party email services like MailChimp.
When an email is received, the recipient's email server will verify its origin. It will query the sender's domain DNS to retrieve the SPF record and check whether the sending server's IP address is authorized. If the email is not from a listed address, it will be marked as suspicious, flagged, or rejected.

By ensuring only authorized servers can send emails from a specific domain, SPF prevents malicious users from spoofing a company's email address. By rejecting emails that don’t originate from approved sources, SPF reduces the risk of spam and phishing attacks on both the sender and recipient ends.
Many online tools are available to help write the SPF record, such as the one from easyDMARC: https://easydmarc.com/tools/spf-record-generator. Once you have the record in the correct syntax, sign in to your domain host (the service where the domain was purchased). You can find your domain host (also call a domain registrar) here: https://lookup.icann.org/en. The domain host will either be under “Registrar Information”, or, if the domain was resold, in a “Reseller” entry under “Raw Registry RDAP Response“.
Once you are signed in to your domain host, navigate to the page where you can update your DNS TXT records. There you can add an entry to the DNS table. The available fields will be: Type, Host, Value, and TTL. Type should be set to TXT, and Host to your domain name. If the domain name is not a subdomain, the character “@” is used. The value field is where you should enter the SPF record you created. TTL stands for Time To Live-how long the server will wait before implementing the new DNS record. Based on your domain host, you might not have the option to change this value. If so, just leave the default setting. If you can set the value, input 3600 (this value is in seconds-so 3600 seconds equals one hour).
It is important to note that without explicit instructions (usually from DMARC), emails that fail SPF checks may still be delivered as usual, without any special handling or filtering.
Congratulations!! You have set up your SPF record and are one step closer to securing your emails!
DKIM
DomainKeys Identified Mail (DKIM) is an email authentication protocol designed to verify that the sender of an email is who they claim to be. DKIM uses digital signatures involving a pair of cryptographic keys—private and public keys—to ensure the integrity of the email during transit.
How DKIM Works
The first step is to generate the keys. The email domain owner generates a pair of cryptographic keys: a private key and a public key. The private key is kept secret and is used by the email server to generate a unique signature for outgoing emails. The public key is stored as a DNS TXT record, making it available for anyone to use for verification.
The next step is to sign the email. When an email is sent, the email server uses the private key to create a unique digital signature for the email. This signature is included in the email’s header as part of the DKIM-Signature field. The digital signature is created based on the contents of the email, ensuring any alteration during transit will make verification fail.
Now, the email can be verified. When the recipient's email server receives the email, it retrieves the public key from the sender’s DNS. The recipient server then uses this public key to decrypt the signature and verify its authenticity. If the decrypted value matches the email content, it confirms that the email has not been altered and is truly from the purported sender.
DKIM is very useful. Not only does it verify that the sender is who they claim to be, but it also ensures data integrity by using the actual content in the encryption.

It is important to note that without explicit instructions (usually from DMARC), emails that fail DKIM checks may still be delivered as usual, without any special handling or filtering.
To set up DKIM, different processes are needed for Google Workspace and Microsoft 365. For Google Workspace, sign in to the admin console, and navigate to the Gmail page. Once there, click Authenticate Email and Generate New Record. Make sure to set the bit length to 2048 if possible. If not, keep it to 1024. Copy the key and sign in to your domain host. Go to the page where you can update your DNS TXT records. Add (or update) the TXT record by inputting all the necessary values. The record Type is TXT. Under host, place the domain name if it is a subdomain. If this record is for the base domain that you are signed in to, place ‘@’. Value is where you can paste your DKIM key. (TTL should be left out.) Don’t forget to save the changes, and turn on DKIM. Once that is done, go back to the Gmail page in the admin console and click Start Authentication.
For Microsoft 365, create two records, called CNAME. The first line will be selector1._domiankey for the first record, and selector2._domiankey for the second.
The second line, Points to address or value, has the value <CustomDomain>. This is the domain name, with periods replaced by dashes. You also need the value for <InitialDomain>. This is the onmicrosoft.com domain that was used when enrolling in Microsoft 365.
So the CNAME record should look like:
Hostname: selector1._domainkey
Points to address or value: selector1-cookies-com._domainkey.cookiesandmilk.onmicrosoft.com
Hostname: selector2._domainkey
Points to address or value: selector2-cookies-com._domainkey.cookiesandmilk.onmicrosoft.com
Go to the Email Authentication Settings page in the Defender portal and turn on the sign message toggle. Next go to your domain host and create a new DNS record using the CNAME record you created.
Great job! You’re now two-thirds of the way there to more secure emails!!
DMARC
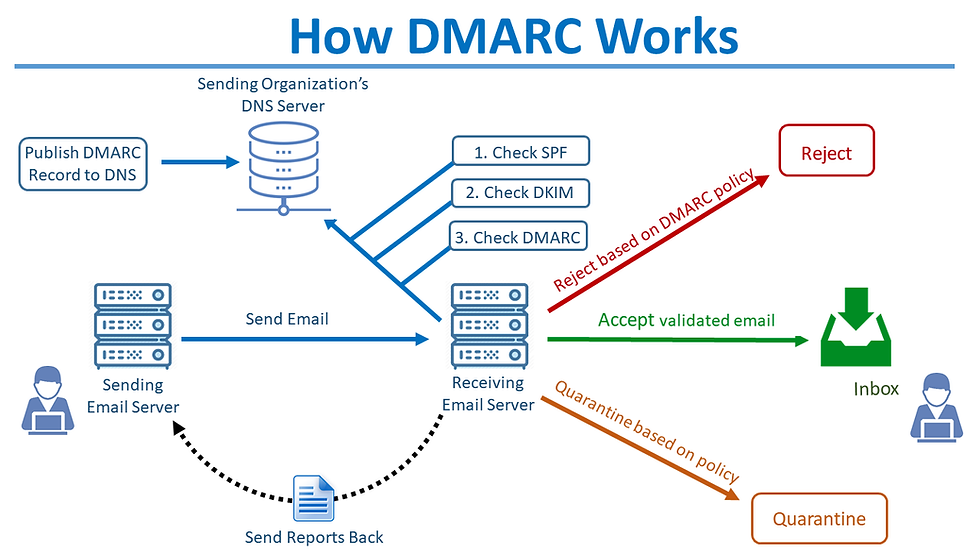
Domain-based Message Authentication, Reporting & Conformance (DMARC) is an email authentication protocol that builds upon SPF and DKIM to provide domain owners with control over how emails from their domain should be handled. DMARC ensures that unauthorized or forged emails are properly managed by specifying the actions to be taken based on the results of SPF and DKIM verification.
How DMARC Works
The domain owner publishes a DMARC policy as a DNS TXT record. This policy includes instructions on how to handle emails that fail SPF and/or DKIM authentication checks. The policy can instruct receiving email servers to either deliver the email, quarantine the email, typically moving it to the spam/junk folder, or reject the email, preventing it from reaching the recipient at all.
DMARC requires that SPF and DKIM results align with the domain name in the ‘From’ header of the email. This alignment ensures that the email is sent by an authorized server and signed correctly, making it harder for attackers to spoof email addresses.
DMARC also supports reporting. Domain owners can receive reports from recipient servers detailing how their domain's emails were handled, including the results of SPF and DKIM checks. These are useful as the reports alert companies if their emails are being spoofed, allowing them to take back control of their domain.
To set up DMARC, first create the record: https://dmarcian.com/dmarc-record-wizard/ When creating the record, you can specify how strict the servers should be with matching the SPF and DKIM, as well as what should be done with messages that fail-nothing, they can be sent to spam, or rejected. An email address should be provided directing the server where to send reports to. It is recommended that a new email be set up to receive all the reports as hundreds, or even thousands, can be generated every day.
Once generated, the DMARC record should be placed in a new DNS record on your domain host, in the same way that records were created for SPF and DKIM.
Once the DMARC record is set up, it can be very helpful to use a third-party platform to manage DMARC. This is so important, as these services offer dashboards and summaries, making it easier to see the current status of the email security settings, as well as pinpoint any issues and security gaps. This is so helpful, as DMARC can generate hundreds of technical emails a day, making it very difficult to understand the current status of the email security. Two of the top platforms are Dmarcian and Cloudflare. Both these services offer free tiers, which can be perfect for small businesses. Setup for both platforms is very easy and intuitive, allowing for a quick registration, bringing users that much closer to full email security management.
Email security is vital to the security and reputation of your organization. Here at Tel-Arm, we’d be more than happy to assist in setting these policies up, to ensure a seamless and quick transition to smoother email delivery. Reach out!


Comments